E-Documents allow the patient to fill out a form while in the virtual waiting room, and electronically sign it. Users with an Account Administrator or Clinical Supervisor role can create/edit as many templates as needed, and delete templates as well. Common uses for these E-Documents include Statements of Understanding and intake forms. For a good overview of this feature, please see the video recording of a webinar we hosted on e-documents.
This support article illustrates how to create or edit an E-Document.
You may also be interested in:
Sections
Create a New Document
This requires an Account Administrator or Clinical Supervisor role.
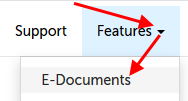
- Click on the "Features" tab and select "E-Documents" from the drop-down menu.
- On the next page, use the "New Template" button in the lower left-hand corner.

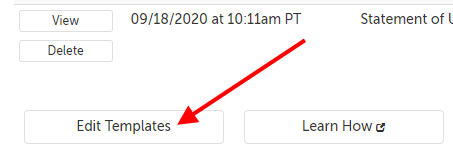
- If you have already received E-Documents before, click on the "Edit Templates" button in the lower left-hand corner first, and then the "New Template" button on the next page.

- When you have filled out the document fields and entered your content, use the "Save and Preview" button in the lower left-hand corner to save your changes and create your document. Check the preview for any design errors.

Edit an Existing Document
This requires an Account Administrator or Clinical Supervisor role.
- Click on the "Features" tab and select "E-Documents" from the drop-down menu.
- On the next page, use the "Edit Templates" button in the lower left-hand corner.
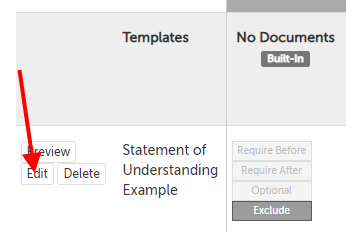
- Use the "Edit" button to the left of the template you would like to edit.
- When you have filled out the document fields and entered your content, use the "Save and Preview" button in the lower left-hand corner to save your changes and create your document. Check the preview for any design errors.

Document Fields
Document Name
- Create a new document or edit an existing document.
- While on the create or edit template page, enter the name of the document as you would like it to appear on the waiting room page. (Example: on the left is the setting as it appears on the create or edit template page, and on the right is an image of how it will appear to your participant.)

Who Can See Completed Documents?
1. Create a new document or edit an existing document.
2. This field determines which session participants can see the document, and who it is assigned to. The options:
- Only Signer and Session Host: This selection means that only the participant filling out the document, and the host of the session, can see this form's status and contents. (This is the default selection.) If this document is only assigned to the host, then only the host will be able to view this form's status and contents.
- All Session Participants: This selection means that ALL participants that have been invited to this session will be able to see if this form has been assigned to ANY participants, as well as view the form after it has been filled out. Select this option if you want to be able to allow participants to view and sign others' forms. For example, if this form is meant to have an additional signature for a parent or guardian, you can invite the parent/guardian to the session so that they can view and sign the form that their child submits.

Signature Type
1. Create a new document or edit an existing document.
2. This field determines what type of signature field your participant will see.
- No Signature Box: There will not be any signature field. Select this option for documents that you only want a participant to have the option of viewing without any confirmation that they have done so, such as a resources list or tips page. E-documents with this setting selected cannot be marked as required.
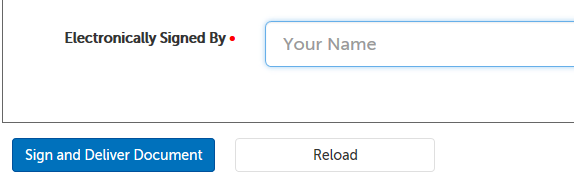
- Keyboard-Typed Signature: A normal electronic signature field will appear where your participant can type in their name.
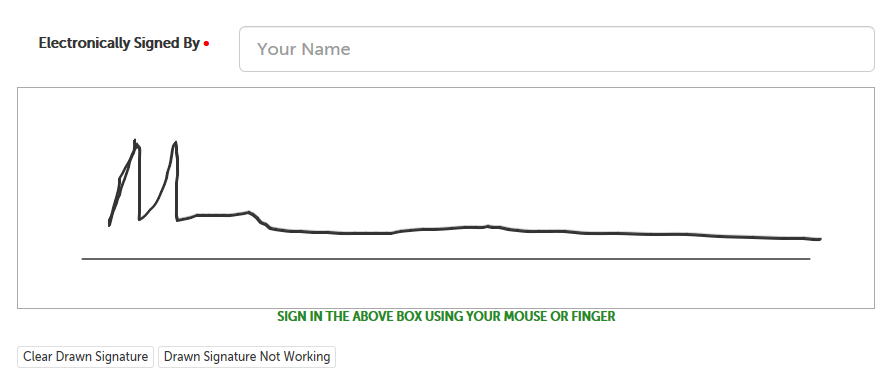
- Mouse- or Hand-Drawn Signature: A box appears where the participant can use their mouse (or if they are on a device with a touch screen, their finger) to create an image signature. (Your participant will still have to enter their name in the normal electronic signature field, like a "print signature" section on a physical document.)
- Note: The drawn signature option is only presented to the original signer. Additional signatures will be typed.
- Clear Drawn Signature: Gives the participant the option to clear what they've drawn and re-do.
- Drawn Signature Not Working: If the field is not working with their touch screen device, they can dismiss the drawn image field and type their name into the regular signature box.
Prefill fields from prior Session Documents?
1. Create a new document or edit an existing document.
2. if you have the same field across different documents that should all be filled out for a single person, you can choose to have the information entered in one carry over to other documents in the meeting. For example, assume a patient completes a Statement of Understanding document that has a "Patient Name" field with her name "Jane Doe". If the host of the session is filling out a Patient Chart document that also has a "Patient Name" field, this setting would allow the name in the Statement of Understanding to prefill the Patient Chart document with the same name. (This should NOT be enabled for documents that will be used in group sessions, where there may be information concerning more than one person.)
- Yes: Make the field value in one e-document pre-populate fields in all other e-documents assigned within the same meeting, if the field names match.
- No: The field value in one e-document will NOT pre-populate fields in all other e-documents assigned within the same meeting.
Is Landscape?
1. Create a new document or edit an existing document.
2. This field determines if you want this e-document to display in landscape mode when exported as a PDF.
- Yes: Make PDF exports of this e-document orient in landscape mode.
- No: Make PDF exports of this e-document orient in portrait mode.
Sort Order
When there are multiple documents pending for a session, they are sorted in the following order:
- Assignment: who is supposed to fill the document out (documents assigned to you, if any, appear first)
- Requirement status: the current status of the document (i.e., required pre-session, required post-session, submitted, or optional)
- Customer sort order (this field, if edited by customer): this field sets an ascending sort, so lower-numbered documents will appear above those with higher numbers
- Document creation date
Document Text
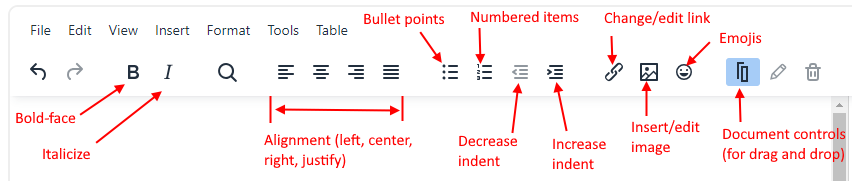
You can create the document text using our Rich Text Editor. We will automatically add a signature field to the end of the document, so you do not need to include it in the document body.
You can use the Rich Text Editor to format your document in a variety of ways.
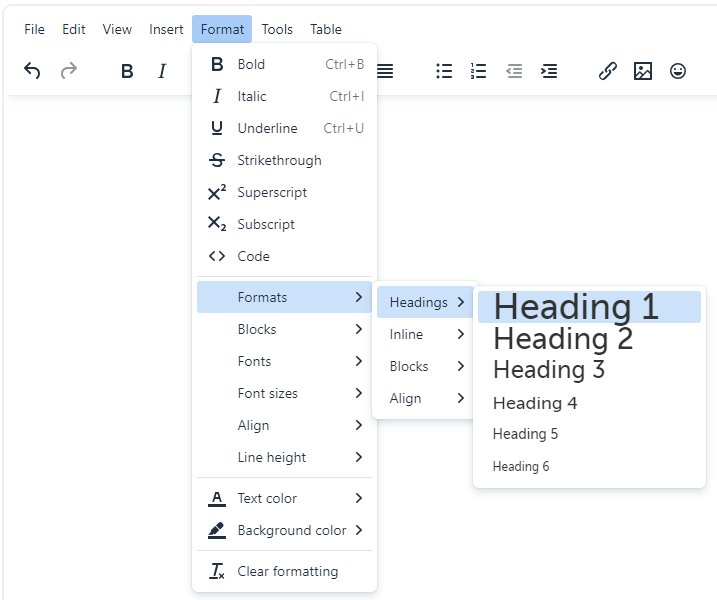
You can also format your text using pre-set headers by clicking on "Format" and selecting "Formats", which will slide out a menu of different header formats. Select the header that you like.
Fillable Fields
SecureVideo has a number of different field types that you can use. Any field type can be marked as required.
You can create fields in two different ways. Please see our support articles for:
Show to Your Clients Now?
1. Create a new document or edit an existing document.
2. This field determines if you want the form to be visible (i.e., active) or not.
- Yes, make this e-document active: Make this form visible to session participants.
- No, make this e-document inactive: Make this form NOT visible to session participants. (This will not remove it from any packets you've added it to; it just won't be visible even if that packet is chosen.)
This article was last reviewed by our Support team on September 12, 2022.